91Received board, first impressions....
Added by 917k about 9 years ago
First I would like to say that I am amazed at what has been created here. Although I haven't had time to do anything other than examine the hardware, the main board looks to be well designed and produced, very professional. You guys should be very proud of what you have accomplished. I am overall very happy so far. This system is literally a dream come true (well 95%... VBXE support would make it 100% but that is another issue). As a member of the test/evaluation team for this project I would like to present my initial first impressions. As I said, the design of the main board overall is very nice so with that said, here are my observations of things that in my opinion could (and in some cases should) be changed/improved...
MAIN BOARD
An issue I have observed is concerning the power switch, it sits several mm too far to the right which places it outside the space of the mini-itx i/o shield area and so it does not clear the case. It will require cutting the case to make the i/o shield area wider to allow the main board to move over the necessary few mm to be able to line up with the welded standoffs on the mini-itx case. As it is, it will not line up. I do not feel the switch is even necessary and should be probably replaced with a 2-pin header to allow the case power switch (or any wired switch) to be used instead. Having the switch there also invites a short on the underside of the daughter card when reaching around the back and faffing about trying to turn the unit off... but I will elaborate more on that in the next section. I am also not sure I understand using a USB A connector for power, this is rather non-standard over here and I think I would rather see a barrel connector be used instead which I think might also save some space as well.
DAUGHTER CARD
So I understand what you guys were thinking when this was designed, however this is the one part that I don't think works very well in practice. If the daughter card were the same width (or slightly smaller) than the i/o shield, it could sit right above the main board which would not only allow the board to be protected by the case but would present a much cleaner appearance as most of the connectors could still reside within the i/o shield area. The SIO port does clear the vertical space of the i/o shield when I did a test placement. To save space, I would either replace the 1/2/3/4 DB9 sockets with serial header connectors and allow people to connect the joystick ports wherever they want (my case has cutouts for 2 DB9 and a single expansion slot that could accommodate the other 3/4 on the bracket) or perhaps 1/2 could be DB9 ports mounted 90 degrees near the SIO plug and 3/4 internally as headers. The trade off would be having to cut a hole in the top cover for the cartridge slot. Lastly I see the USB A has been used as a serial interface which I think is a bit confusing, perhaps a FTDI header could be used?
All in all, this is going to be a fun system to put through it's paces and I am very excited the concept and execution. I think it is close to being somebody truly outstanding and I hope you will accept my comments above in the spirit in which they were intended.
Thank you for including me in this process.
Steve
Replies (5)
FO RE: Received board, first impressions.... - Added by foft about 9 years ago
Hi Steve,
Exciting it arrived:)
Thanks for the feedback. We need to keep a track of issues from this board so we make sure to fix them on all the final version. I guess I should start a new wiki page to track them.
If the main board does not fit its certainly a problem. It is intended to fit within a standard mini-itx IO panel footprint. Could you measure how many millimetres we are off vs the spec please?
@Panos, can you also please double check the dimensions here while you still have one!
I massively prefer USB for power than a barrel connector. The barrel connectors tend to be of varying voltage and polarity. I have about 10 FPGA boards and it does my head in trying to work out which one needs which adaptor. USB is very much the standard 5V DC supply these days. That is typically micro-USB (as mandated by the EU to stop the phone proliferation of chargers), but in my option its too fragile, I've seen so many failed boards with micro-USB. Perhaps we should think about USB-C, it looks sturdier but I've not checked out the details.
The USB A on the sub-board is actually serial over USB. So it can be directly connected to PC via USB cable.
I'm still not convinced about the sub-board sticking out the back. The physical support issues we had on v1 (it was wobbly) are solved and all the actual electronics are on the main board. We also talked about having an external box for cartridge. Perhaps we should have a brainstorm thread on what to do about this. Preferably with drawings. One thing about the design is that all the actual electronics are on the main board, so the connectors themselves can be wired up however people want from the 40 pin headers. Additionally the sub-board is a simple board that is much cheaper to make than the main board, so we can make/order a different design without much cost.
Regards,
Mark
SA RE: Received board, first impressions.... - Added by sadosp about 9 years ago
Hi Steve and Mark. :-)
Except Steve here, Mike and Lyren boards also have arrived, although have not respond public yet.
I have no comments about the sub board, because is it clear that someone can build it according to his needs in the future! This was the reason that we left there only the connectors, as Mark also mentioned above.
Now about the issue of power switch on main board, is something I have just discovered with great surprise, after I read the message of Steve. Yes main board can not be aligned with ITX case stands because of the plastic black cap of rocker switch, which exceed from the main body of switch at 1 to 1.5 mm. I am very sorry who something like this escaped my attention.
So I can propose two solutions.
1. Because we have to do with a very small deviation of 1 to 2 mm to the right, in a height of 1.7 cm, someone with a dremel tool can be very easily to smooth the back frame of the ITX case.
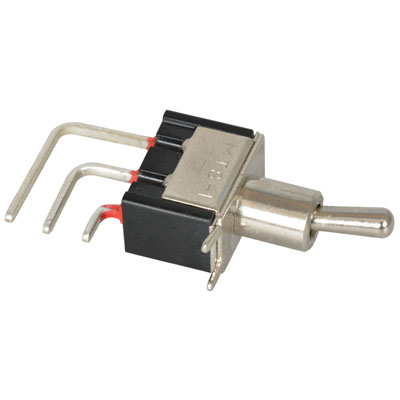
2. Desolder from the main board the Atari rocker type switch, and solder in its place the exact same angled switch but the "toggle" type. I mean like this one below.
Please if you choose the second way, let me know it as to provide the exact part number from Mouser or Digikey.
Steve, I place the power switch alone on the edge (top for vertical or right for horizontal ITX case's), so to be easy for someone to reach it without to tangled with cables etc.
I know that initially this will look somehow strange for you, but when you start to use it more frequent, your fingers will placed there without even thinking about it!
And not fear for short circuit or any static by your fingers behind the sub board on this area.
Panos
SA RE: Received board, first impressions.... - Added by sadosp about 9 years ago
Alternate toggle type switches.
Mouser 633-M2012SA2W40
DigiKey 360-2837-ND
Arrow M2012SA2W40
91 RE: Received board, first impressions.... - Added by 917k about 9 years ago
Back from holiday so I should have some more time to spend on the project. I ordered the switch Panos recommended so that should arrive within the next few days. I think I am going to mount the daughter board to the rear of the main board using one foot serial straight-through extension cables to case-mount the joystick ports. I am looking to try and source parts to relocate the SIO and cartridge slot.
I'd like to work on the keymaps but not sure exactly what you need for that, if you can point me in the right direction I would be happy to work on it.
Cheers
FO RE: Received board, first impressions.... - Added by foft about 9 years ago
The mapping from ps2 to atari key code is here:
http://www.64kib.com/atarixlfpga_svn/trunk/atari_800xl/common/a8core/ps2_to_atari800.vhdl
(see http://www.computer-engineering.org/ps2keyboard/scancodes2.html)
I started with ps2 you see then added usb support on top. Since the usb layer is software anyway (on the zpu) I added a mapping from usb to ps2 here:
http://www.64kib.com/atarixlfpga_svn/trunk/atari_800xl/firmware/usb/keycodes.h
(See http://www.freebsddiary.org/APC/usb_hid_usages.php)
The atari keycodes are here:
http://atariage.com/forums/topic/188172-pokey-keyboard-codes/#entry2377650
I guess it would make sense to have a direct usb->atari one. If you can build that mapping in a simple machine readable format for several main regional keyboards then I make a utility to build a rom in a suitable format from it. Or if we have space in the firmware we can directly read it. Obviously run the format by me before making it all, so I can check its suitable.